How I Added an AI Chat to My Personal Website
A step by step guide on how I built a RAG powered AI assistant on my site using Cloudflare Vectorize, Workers AI, and Claude. It answers questions about my blog posts, opinions and personal knowledge.
I have a confession. I hate calls.

Not “slightly prefer email” hate. Proper, visceral, calendar anxiety hate. The kind where you see a 30 minute “quick chat” appear in your diary and your soul leaves your body. Nine times out of ten, the question could have been an email. Or better yet, answered by something that already exists on my website.
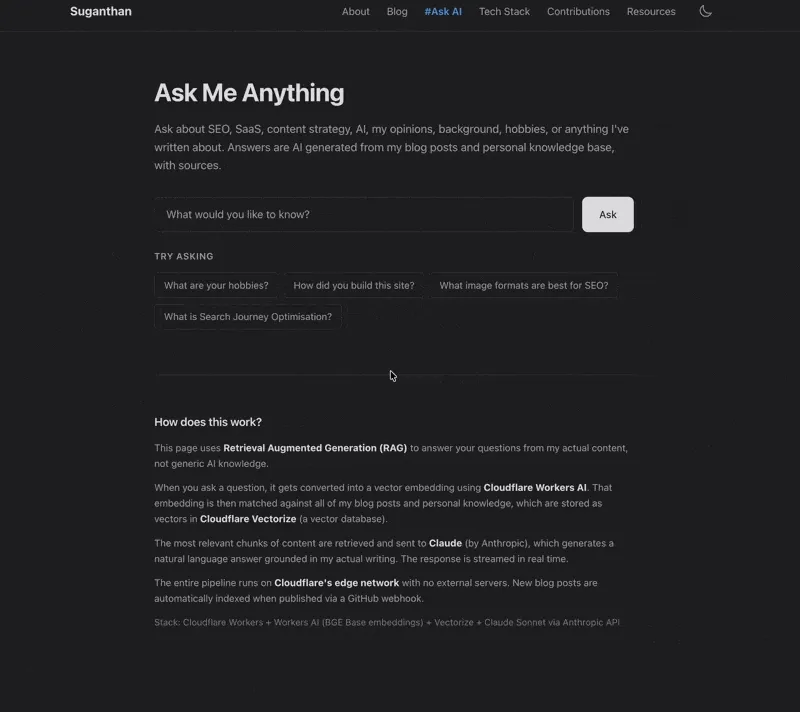
So I built something that does exactly that. An AI assistant that lives at /ask/ and answers questions about my blog posts, my opinions, my tools, my background, even my hobbies. It pulls from everything I’ve written and a personal knowledge base I maintain. No call needed.
Here’s how I built it, why the architecture works the way it does, and how you could do something similar.
Why Build This?
The honest answer? Laziness. The productive kind.
I’ve written over 15 detailed blog posts on SEO, content strategy, tools, and building products. People regularly ask me questions that I’ve already answered in those posts. “What rank tracker do you recommend?” “How did you build your site?” “What image formats should I use?” The answers are all there, buried across thousands of words.
The problem is that nobody reads everything. They land on one post, maybe two, and move on. The knowledge sits fragmented across articles. An AI chat lets someone ask a question in plain English and get a synthesised answer from everything I’ve written, with links back to the source.
There’s also the personal angle. People want to know things about me that aren’t in any blog post. My background, my opinions on AI models, how I’d approach building a SaaS, what it’s like living in Dubai. I don’t want to write a 3,000 word FAQ page. I’d rather maintain a personal knowledge file and let the AI handle the rest.
And yes, it means fewer “quick 15 minute calls” that somehow always turn into 45 minutes.
The Architecture (How It Actually Works)
Before diving into code, here’s the mental model. The system uses something called Retrieval Augmented Generation (RAG). Fancy name, simple concept:
- Take all my blog posts and personal knowledge, break them into small chunks
- Convert each chunk into a mathematical representation (a “vector embedding”) that captures its meaning
- Store those vectors in a database optimised for similarity search
- When someone asks a question, convert it into a vector too
- Find the chunks that are most similar to the question
- Send those relevant chunks to Claude along with the question
- Claude generates an answer grounded in my actual content
The key insight is that Claude never hallucinates from its general training data. It only sees the content I explicitly give it. If my blog doesn’t cover a topic, it says so.
Here’s the stack:
| Layer | Technology |
|---|---|
| Embeddings | Cloudflare Workers AI (BGE Base v1.5, 768 dimensions) |
| Vector Store | Cloudflare Vectorize |
| Answer Generation | Claude Sonnet (via Anthropic API) |
| Runtime | Cloudflare Workers |
| Frontend | Astro (static page with streaming JS) |
Everything runs on Cloudflare’s edge except the final answer generation, which calls Anthropic’s API. No external databases, no Lambda functions, no containers. The entire RAG pipeline lives inside my existing Cloudflare Worker.
Step 1: Create a Vectorize Index
First, you need somewhere to store your vectors. Cloudflare Vectorize is a vector database that runs on the edge. Create an index:
npx wrangler vectorize create blog-embeddings --dimensions=768 --metric=cosineThe 768 dimensions match the BGE Base embedding model I’m using. cosine is the similarity metric (how we measure whether two vectors point in roughly the same direction, aka whether two pieces of content are about similar things).
Then add the bindings to wrangler.jsonc:
{
  "vectorize": [
    {
      "binding": "VECTORIZE",
      "index_name": "blog-embeddings"
    }
  ],
  "ai": {
    "binding": "AI"
  }
}
This gives your Worker access to both the Vectorize database and Cloudflare’s AI models.
Step 2: Content Processing Pipeline
This is where the interesting engineering happens. Raw blog posts are MDX files with frontmatter, import statements, JSX components, and markdown formatting. None of that is useful for semantic search. We need clean, plain text.
Here’s the stripping function:
function stripMdxToPlainText(mdxContent) {
  let text = mdxContent.replace(/^---\n[\s\S]*?\n---/, '');
  text = text.replace(/<[A-Z]\w+[^>]*\/>/g, '');
  text = text.replace(/<[A-Z]\w+[^>]*>[\s\S]*?<\/[A-Z]\w+>/g, '');
  text = text.replace(/!\[([^\]]*)\]\([^)]+\)/g, '');
  text = text.replace(/<[^>]+>/g, '');
  text = text.replace(/\[([^\]]+)\]\([^)]+\)/g, '$1');
  text = text.replace(/(\*\*|__)(.*?)\1/g, '$2');
  text = text.replace(/(\*|_)(.*?)\1/g, '$2');
  text = text.replace(/^#{1,6}\s+/gm, '');
  text = text.replace(/```[\s\S]*?```/g, '');
  text = text.replace(/`([^`]+)`/g, '$1');
  text = text.replace(/\n{3,}/g, '\n\n').trim();
  return text;
}
It progressively strips: frontmatter → JSX components → images → HTML tags → markdown links (keeping the text) → bold/italic markers → headings → code blocks. What’s left is the actual content someone wrote.
Step 3: Chunking Strategy
You can’t embed an entire 3,000 word blog post as a single vector. The embedding model has a context window, and longer texts lose nuance. The solution is chunking: break each post into overlapping segments of roughly 500 to 800 characters.
function chunkText(text, slug, title, tags) {
  const paragraphs = text.split(/\n\n+/).filter(p => p.trim().length > 30);
  const chunks = [];
  let currentChunk = '';
  let chunkIndex = 0;

  for (const para of paragraphs) {
    if (currentChunk.length + para.length > 800 && currentChunk.length > 200) {
      chunks.push({
        id: `${slug}-${chunkIndex}`,
        text: currentChunk.trim(),
        metadata: { slug, title, tags: (tags || []).join(','), chunkIndex }
      });
      chunkIndex++;
      // Overlap: carry the last sentence into the next chunk
      const sentences = currentChunk.split(/(?<=[.!?])\s+/);
      currentChunk = sentences.length > 1
        ? sentences[sentences.length - 1] + '\n\n' + para
        : para;
    } else {
      currentChunk += (currentChunk ? '\n\n' : '') + para;
    }
  }

  if (currentChunk.trim().length > 30) {
    chunks.push({
      id: `${slug}-${chunkIndex}`,
      text: currentChunk.trim(),
      metadata: { slug, title, tags: (tags || []).join(','), chunkIndex }
    });
  }
  return chunks;
}
The overlap is important. Without it, you get hard cuts in the middle of ideas. Carrying the last sentence of the previous chunk into the next one preserves context at the boundaries.
Each chunk also stores metadata: the post slug, title, and tags. This metadata gets returned alongside search results, so we can cite sources properly.
Step 4: Ingestion Endpoint
Now we need a way to actually process all the content and store it. I built an /api/ingest endpoint in my Worker that accepts blog content via POST:
if (path === '/api/ingest' && request.method === 'POST') {
  const secret = request.headers.get('X-Ingest-Secret');
  if (!secret || secret !== env.INGEST_SECRET) {
    return new Response('Unauthorized', { status: 401 });
  }

  const body = await request.json();
  const results = [];

  for (const file of body.files) {
    const mdxContent = file.content;

    // Parse frontmatter, skip drafts
    const fmMatch = mdxContent.match(/^---\n([\s\S]*?)\n---/);
    if (!fmMatch) continue;

    // Strip to plain text, chunk, embed
    const plainText = stripMdxToPlainText(mdxContent);
    const chunks = chunkText(plainText, file.slug, title, tags);

    // Batch embed all chunks
    const embeddingRes = await env.AI.run(
      '@cf/baai/bge-base-en-v1.5',
      { text: chunks.map(c => c.text) }
    );

    // Store in Vectorize
    const vectors = chunks.map((chunk, i) => ({
      id: chunk.id,
      values: embeddingRes.data[i],
      metadata: { ...chunk.metadata, chunkText: chunk.text }
    }));

    await env.VECTORIZE.upsert(vectors);
    results.push({ slug: file.slug, chunks: chunks.length });
  }

  return Response.json({ results });
}
The chunkText field in metadata is crucial. Vectorize returns metadata with search results, so we can pass the actual text content directly to Claude without a separate lookup.
To ingest, I read the local files and POST them:
node -e "
const fs = require('fs');
const files = fs.readdirSync('src/content/blog')
  .filter(f => f.endsWith('.mdx'))
  .map(f => ({
    slug: f.replace('.mdx', ''),
    content: fs.readFileSync('src/content/blog/' + f, 'utf-8')
  }));
fetch('https://suganthan.com/api/ingest/', {
  method: 'POST',
  headers: {
    'Content-Type': 'application/json',
    'X-Ingest-Secret': 'your-secret-here'
  },
  body: JSON.stringify({ files })
}).then(r => r.json()).then(console.log);
"
My 17 published blog posts produced 355 chunks. The entire ingestion takes about 30 seconds.
Step 5: The Query Endpoint
This is where the magic comes together. When someone asks a question:
if (path === '/api/ask' && request.method === 'POST') {
  const { question } = await request.json();

  // 1. Embed the question
  const queryEmbedding = await env.AI.run(
    '@cf/baai/bge-base-en-v1.5',
    { text: [question.trim()] }
  );

  // 2. Find similar chunks
  const vecResults = await env.VECTORIZE.query(
    queryEmbedding.data[0],
    { topK: 8, returnMetadata: 'all' }
  );

  const relevantMatches = vecResults.matches.filter(m => m.score > 0.5);

  if (relevantMatches.length === 0) {
    return Response.json({
      answer: "I don't have relevant content to answer that."
    });
  }

  // 3. Build context from matched chunks
  let context = '';
  for (const match of relevantMatches) {
    const meta = match.metadata;
    context += `\n\n--- From "${meta.title}" ---\n`;
    context += meta.chunkText;
  }

  // 4. Stream Claude's response
  const claudeRes = await fetch('https://api.anthropic.com/v1/messages', {
    method: 'POST',
    headers: {
      'x-api-key': env.ANTHROPIC_API_KEY,
      'anthropic-version': '2023-06-01',
      'content-type': 'application/json',
    },
    body: JSON.stringify({
      model: 'claude-sonnet-4-20250514',
      max_tokens: 1024,
      stream: true,
      system: ASK_SYSTEM_PROMPT,
      messages: [{
        role: 'user',
        content: `Answer this question: "${question}"\n\nCONTENT:${context}`
      }]
    }),
  });

  return new Response(claudeRes.body, {
    headers: { 'Content-Type': 'text/event-stream' }
  });
}
The response streams directly from Anthropic’s API through my Worker to the browser. No buffering. You see the answer typing out in real time, which feels much better than waiting 3 to 5 seconds for a complete response.
Step 6: The Personal Knowledge Base
Here’s where it gets fun. Blog posts cover what I’ve written about. But people ask personal questions too: “What are your hobbies?” “What AI model do you prefer?” “What’s your background?”
The solution is dead simple. I maintain a markdown file at src/content/knowledge/personal.md with structured sections covering my background, opinions, hobbies, career history, tools, and anything else I want the AI to know about me:
---
title: 'Personal Knowledge Base'
description: 'Personal info about Suganthan'
tags:
  - Personal
  - About
---

## Background
Originally from Jaffna, Sri Lanka. Based in Dubai...

## Hobbies and Interests
Fishing, photography, travel...

## Opinions on AI
Claude is excellent for nuanced writing...
This gets ingested exactly like a blog post. Same chunking, same embedding, same Vectorize storage. When someone asks “What are your hobbies?”, the semantic search finds the personal knowledge chunks alongside any blog content about the topic. Claude synthesises both into a natural answer.
To update your personal info, you edit the file and re-ingest. Takes about 10 seconds.
Step 7: Auto Indexing New Posts
I didn’t want to manually re-ingest every time I publish something. My site already has a GitHub webhook handler (for newsletter automation). I added a few lines to automatically embed and store new blog posts whenever they’re pushed:
// Inside the webhook handler, after processing a blog file
if (env.AI && env.VECTORIZE) {
  const plainText = stripMdxToPlainText(mdxContent);
  const chunks = chunkText(plainText, slug, title, tags);
  chunks[0].text = `${title}. ${description}\n\n${chunks[0].text}`;
  chunks.forEach(c => { c.metadata.chunkText = c.text; });

  const texts = chunks.map(c => c.text);
  const embeddingRes = await env.AI.run(
    '@cf/baai/bge-base-en-v1.5',
    { text: texts }
  );

  const vectors = chunks.map((chunk, i) => ({
    id: chunk.id,
    values: embeddingRes.data[i],
    metadata: chunk.metadata
  }));

  await env.VECTORIZE.upsert(vectors);
}
Now when I publish a new post through TinaCMS, the content is saved to GitHub, Cloudflare rebuilds the site, and the webhook handler automatically embeds the new post into Vectorize. Zero manual steps.
Step 8: The Frontend
The /ask/ page is a single Astro page with vanilla JavaScript. No framework, no React, no dependencies. Just a form, some event listeners, and a streaming response parser.
The streaming is the most interesting part. Claude’s API returns Server Sent Events (SSE), where each event contains a small text delta. The frontend reads these incrementally:
var reader = res.body.getReader();
var decoder = new TextDecoder();
var fullText = '';

while (true) {
  var result = await reader.read();
  if (result.done) break;

  // Parse SSE events, extract text deltas
  var lines = decoder.decode(result.value).split('\n');
  for (var line of lines) {
    if (!line.startsWith('data: ')) continue;
    var event = JSON.parse(line.slice(6));
    if (event.type === 'content_block_delta') {
      fullText += event.delta.text;
      renderAnswer(fullText);  // Update the page in real time
    }
  }
}
I also added some small touches to make it feel alive:
Thinking dots that bounce while waiting for the first token. Three small circles in the accent colour, animating with staggered delays.
Rotating status text that cycles through “Thinking…”, “Searching content…”, “Reading relevant posts…”, “Generating answer…” every two seconds during loading.
A blinking cursor that appears at the end of the streaming text, like a terminal caret, and disappears when the response is complete.
Suggestion pills that fade in with a stagger effect when the page loads. Clicking one fills the input and immediately submits.
None of these are complex. A few CSS keyframes and some classList.add() calls. But they make the difference between “a form that returns text” and something that feels genuinely interactive.
Rate Limiting
You don’t want someone (or a bot) hammering your Claude API key. I added a simple KV based rate limiter: 5 requests per minute per IP address.
async function checkAskRateLimit(env, ip) {
  const key = `ratelimit:ask:${ip}`;
  const current = await env.NEWSLETTER_KV.get(key);
  const count = current ? parseInt(current, 10) : 0;
  if (count >= 5) return false;
  await env.NEWSLETTER_KV.put(key, String(count + 1), {
    expirationTtl: 60
  });
  return true;
}
Cloudflare KV’s TTL handles the cleanup automatically. After 60 seconds, the key expires and the limit resets. Simple, no external dependencies.
Use Cases (A.K.A. Why I Actually Built This)
Let me be real about why this exists.

I hate calls. Not in a rude way. In a “that question has an answer on my website and we both just lost 30 minutes” way. Now I can say “Ask my AI, it knows everything I know” and mean it literally.
Content discovery. I’ve written 50,000+ words across my blog posts. Nobody is going to read all of that. But the AI can synthesise information from multiple posts into a single coherent answer. It’s like having a very well read assistant who’s memorised everything I’ve published.
Personal branding. Having an AI chat on your personal site in 2026 is a statement. It says “I build things” without having to say it. The “How does this work?” section at the bottom of the page gives technical visitors the architecture details, which often leads to better conversations than a portfolio ever would.
Qualifying conversations. When someone does eventually book a call, they’ve already gotten the basics from the AI. “I read that you use Ahrefs and AccuRanker” is a much better opening than “so tell me about yourself.” The call becomes productive immediately.
It’s just cool. I’m not going to pretend there isn’t a vanity element. Asking “What are Suganthan’s hobbies?” and getting a correct, sourced answer from your own website is genuinely satisfying. Sue me.
What It Costs
Let’s talk money. For a personal site with moderate traffic:
Cloudflare Vectorize: Included in the Workers paid plan ($5/month, which I already pay for hosting)
Cloudflare Workers AI: The embedding model is free tier eligible. Even at scale, it’s fractions of a cent per query.
Anthropic API (Claude): This is the main cost. Each answer uses roughly 1,000 to 2,000 input tokens (context) and 300 to 800 output tokens. At Claude Sonnet’s pricing, that’s roughly $0.01 to $0.03 per question. The rate limiter keeps this manageable.
For a personal site getting maybe 50 to 100 AI questions per month, we’re talking $1 to $3 in API costs. The Cloudflare infrastructure adds nothing beyond what I was already paying.
What I’d Do Differently
Better chunking. My current approach splits by paragraph boundaries. A smarter approach would be section aware: keeping entire H2 sections together when they’re under the size limit. This preserves more context per chunk.
Conversation memory. Right now each question is independent. Adding follow up ability (“tell me more about that”) would require storing the previous Q&A pair and sending it as context. Doable, but adds complexity.
Analytics. I should be tracking what people ask. Not the answers, just the questions. This would tell me what topics to write about next. If 20 people ask about “technical SEO audits” and I haven’t written about it, that’s a content gap I should fill.
Try It
Head to /ask/ and ask me anything. About SEO, building products, my tech stack, fishing in Norway, or whatever you’re curious about. If the answer is somewhere in my writing or knowledge base, the AI will find it.
And if you still want a call after that, well, at least it’ll be a productive one.
Stay in the loop
I'll email you when I publish something new. No spam. No fluff.
Unsubscribe anytime.

Entrepreneur & Search Journey Optimisation Consultant. Co-founder of Keyword Insights and Snippet Digital.